Linked List
하나의 노드는 다음 노드만을 가리킨다.

위 linked list의 구조를 작성하면 다음과 같다.
// linked list 구조

const list = {
  head: {
    value: 22,
    next: {
      value: 2,
      next: {
        value: 77,
        next: {
          value: 6,
          next: {
            value: 43,
            next: {
              value: 76,
              next: {
                value: 89,
                next: null
              },
            },
	  },
        },
      },
    },
  },
}
이제 원하는 linked list를 구현할 수 있는 코드를 작성해보자.
// Linked List 만들기

class Node {  // 노드 하나를 정의하는 클래스
  constructor(data) {
    this.data = data;
    this.next = null; // 다음 노드 없음
  }
}

class LinkedList {  // 전체를 정의하는 클래스
  constructor() {
    let init = new Node('init');
    this.head = init;
    this.tail = init;

    this.currentNode = undefined;
    this.dataLength = 0;
  }

  length() {
    return this.dataLength;
  }
}
LinkedList 클래스의 인스턴스를 생성하면 새로운 노드(init)가 하나 생성되고, head와 tail에 그 노드가 할당된다.
length(), append() 메서드
class LinkedList {
  constructor() {
	...
  }

  length() {
    return this.dataLength;
  }

  append(data) {
    let newNode = new Node(data);
    this.tail.next = newNode;
    this.tail = newNode;
    this.dataLength += 1;
  }
}
this.tail.next = newNode;
this.tail = newNode;
이 두 코드는 새로운 노드를 추가할 때 무조건 가장 마지막에 위치시킬 수 있도록 만든다.
기존 tail의 next로 newNode를 연결하고 tail에는 newNode 자체를 할당한다.
아래와 같이 LinkedList의 인스턴스를 만들고 자식 노드를 추가할 수 있다.
let ll = new LinkedList();

ll.append(1);
ll.append(2);
ll.append(3);
ll.append(10);
ll.append(20);
ll.append(30);
toString(), insert(), fullData() 메서드
class LinkedList {

    ...

  toString() {
    let current = this.head;
    current = current.next;

    let s = '';
    for (let i = 0; i < this.dataLength; i++) {
      s += `${current.data}, `
      current = current.next;
    }
    return `[${s.slice(0, -2)}]`;
  }

  insert(index, data) {
    let current = this.head;
    current = current.next;

    for (let i = 0; i < index - 1; i++) {
      current = current.next;
    }


	// 이 구조를 이해하는 것이 중요하다.

    let newNode = new Node(data);
    newNode.next = current.next;
    // 새로 집어 넣는 노드의 next가, 자신이 들어갈 자리의 다음 노드를 가리키도록 한다.
    current.next = newNode;
    // 자신이 들어갈 자리 이전 노드의 next가 자신을 가리키도록 한다.

    this.dataLength += 1;
  }

  get fullData() {
    let current = this.head;
    current = current.next;

    let s = '';
    for (let i = 0; i < this.dataLength; i++) {
      s += `${current.data}, `
      current = current.next;
    }
    return JSON.parse(`[${s.slice(0, -2)}]`);
  }
}
insert()의 경우, 그냥 사이에 우겨넣는 느낌이 아니다. 정확하게 자신이 들어갈 자리 다음 노드를 next로 가리키게 해주고 이전 노드의 next는 자기 자신을 가리키게 해주는 것이 포인트다.
이진 트리
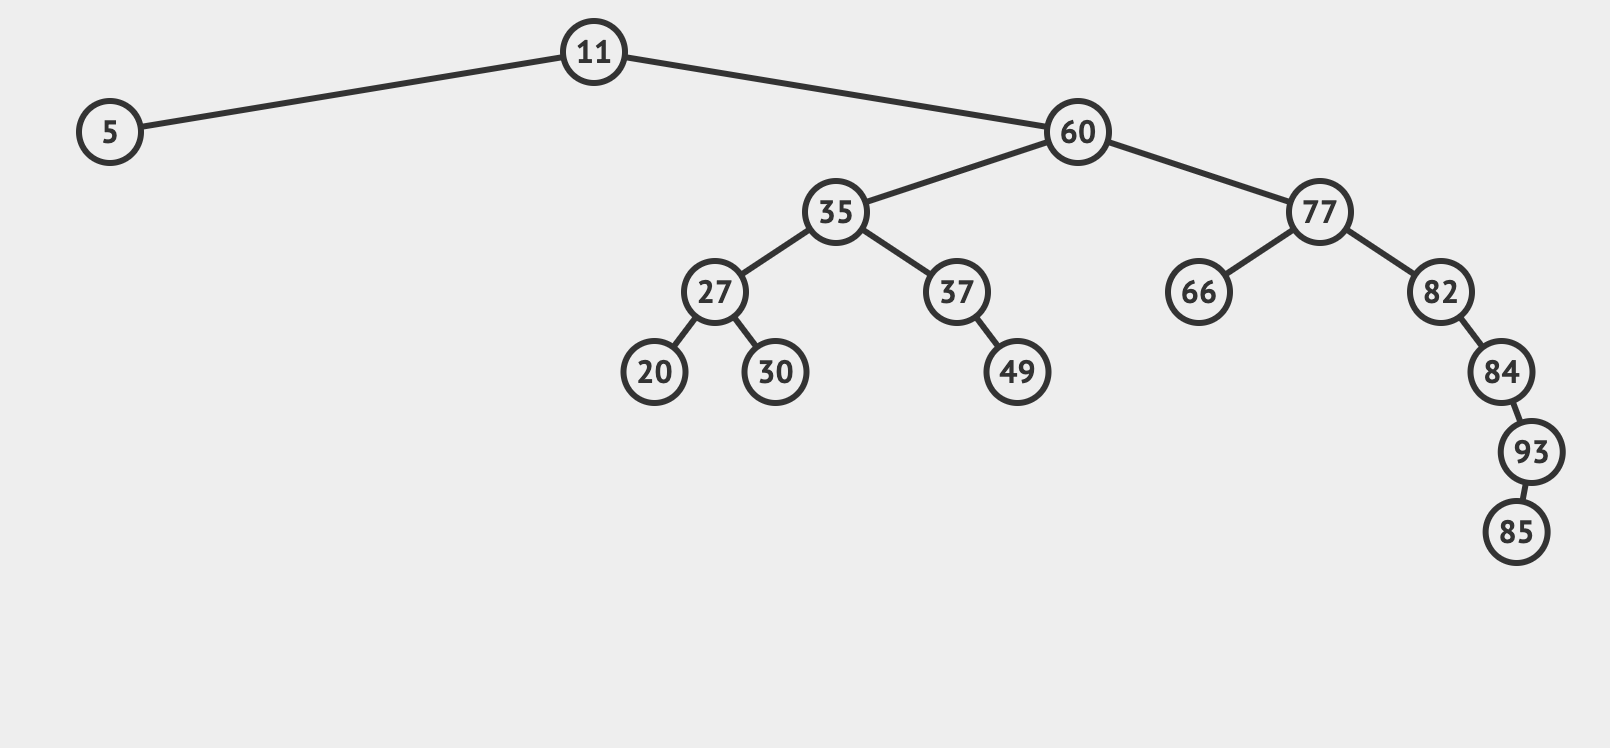
이진 트리: 자기 자신에게서 최대 두 개의 자식이 뻗어나갈 수 있는 구조.
코드로 작성하면 아래와 같다.
class Node {
  constructor(data) {
    this.data = data;
    // this.child = []; 이렇게 가면 이진 트리가 아니고 그냥 트리
    this.left = null;
    this.right = null;
  }
}

class Tree {
  constructor(data) {
    let init = new Node(data);
    this.root = init;
    this.dataLength = 0;
  }

  length() {
    return this.dataLength;
  }

  insert(data) {
    let newNode = new Node(data);
    let currentNode = this.root;

    while(currentNode) {

    // 왜 여기서는 while 문을 쓸까?

    // while 문을 currentNode가 있을 때까지 돌린다.
    // 아래에서 currentNode는 currentNode.left 혹은 currentNode.right로 계속
    // 최신화되기 때문에 어느 지점에서는 currentNode가 없게 된다.

      if(data === currentNode.data) {
        return;
      }
      if(data < currentNode.data) {
        if(!currentNode.left) {
          currentNode.left = newNode;
          this.dataLength += 1;
          return;
        }
        currentNode = currentNode.left;
      }
      if(data > currentNode.data) {
        if(!currentNode.right) {
          currentNode.right = newNode;
          this.dataLength += 1;
          return;
        }
        currentNode = currentNode.right;
      }
    }
  }
}
DFS
DFS는 stack을 활용해 트리를 탐색한다. stack은 LIFO(Last In First Out) 구조를 가진다.
제일 마지막으로 들어온 요소가 제일 빨리 나간다는 것이다. 아래의 예시를 보자.
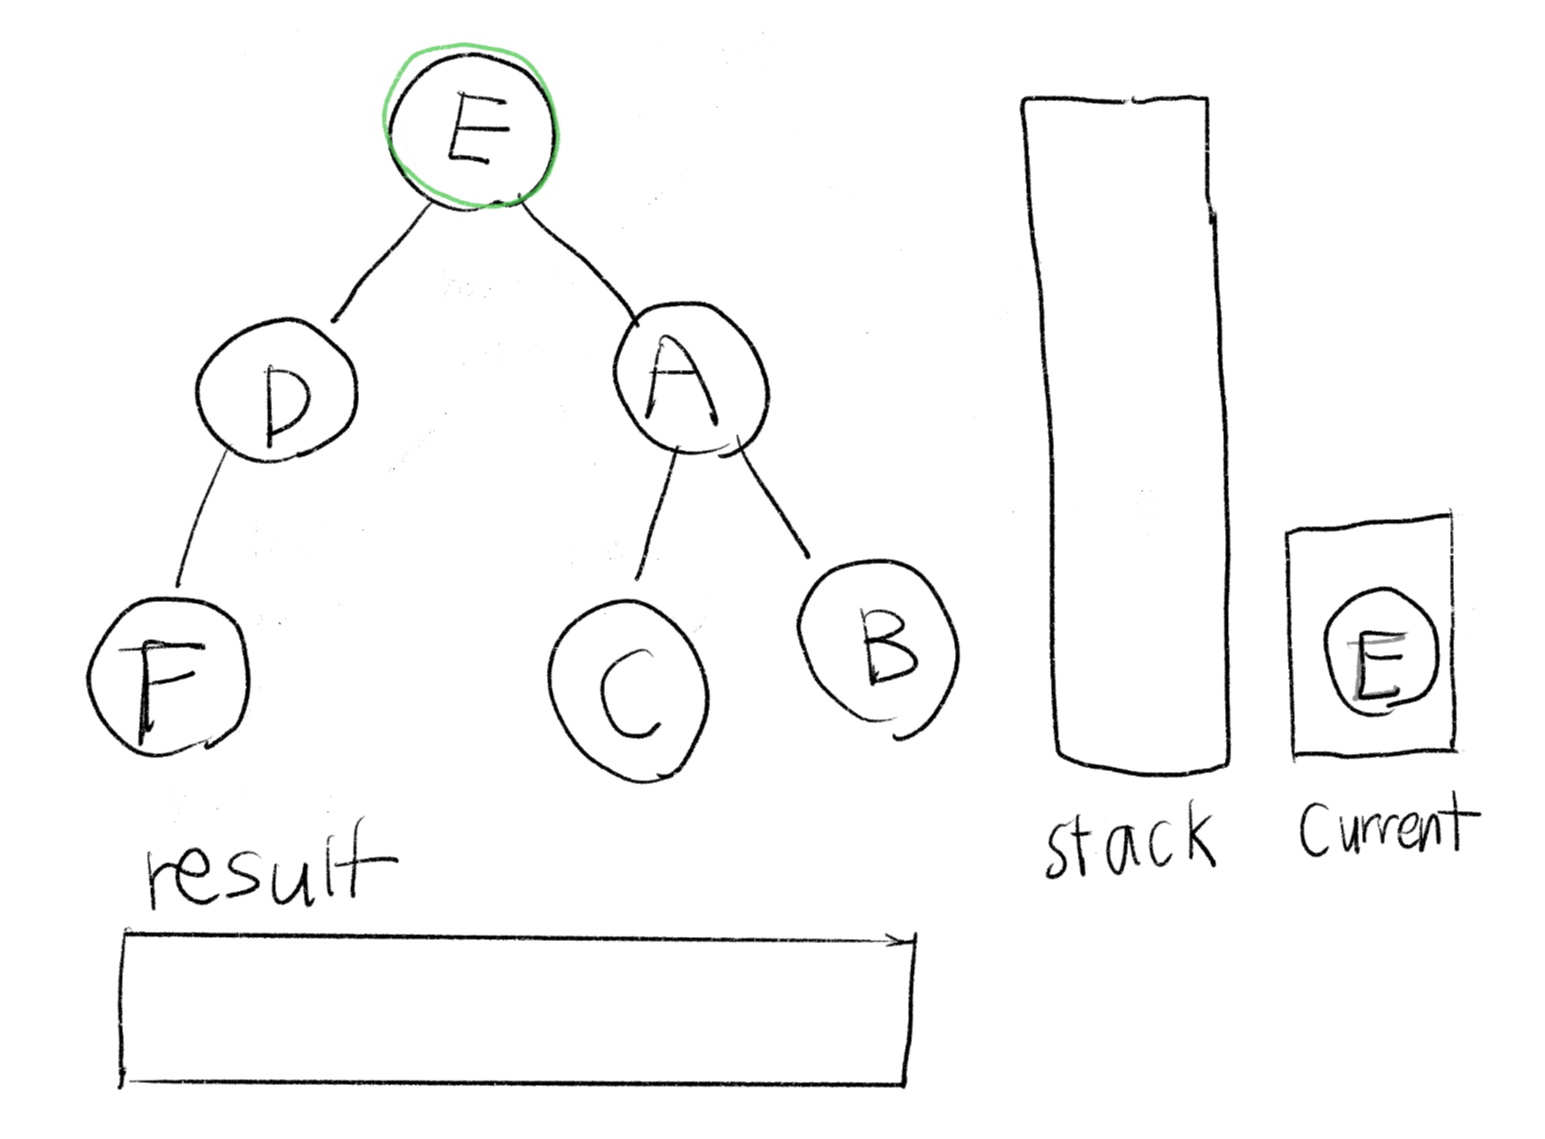
E부터 탐색한다. E가 current에서 result로 넘어가면서 E와 연결된 D와 A는 stack에 쌓인다.
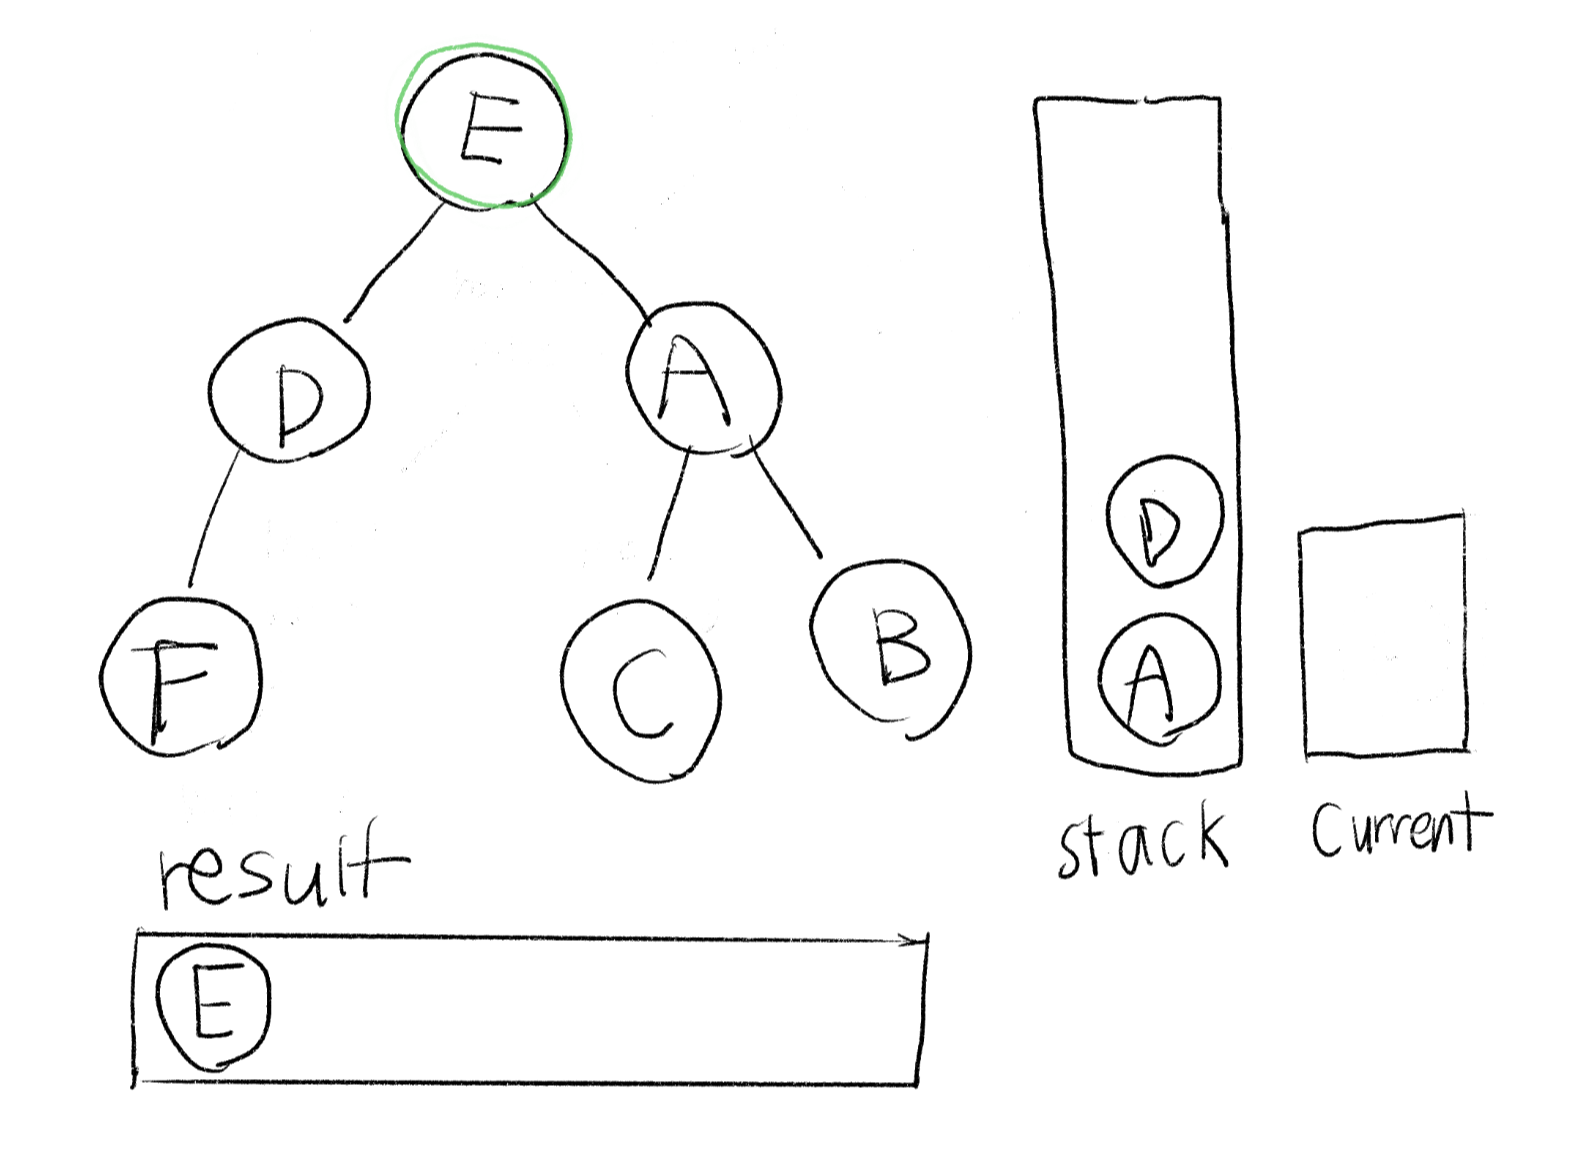
stack에서는 D만 꺼낼 수 있다.
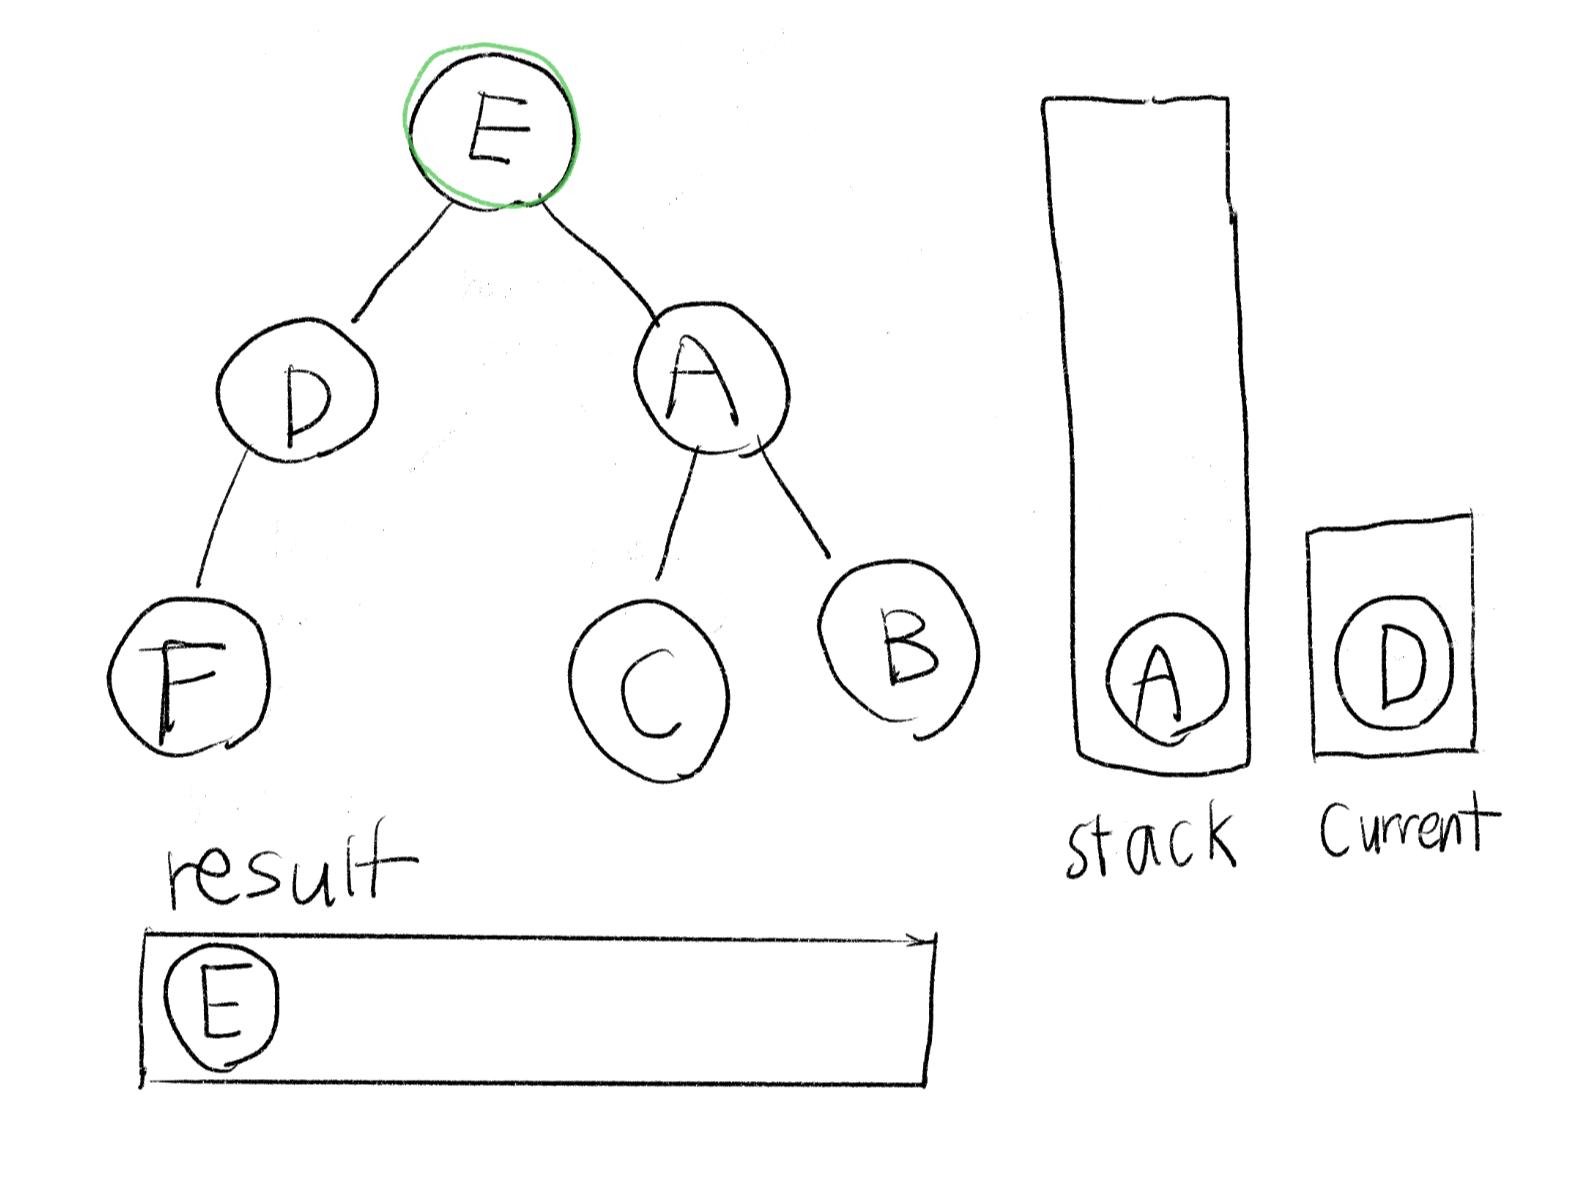
D가 result로 가면서 stack에는 D와 연결된 F가 쌓인다.

F가 result로 가는데 F 아래로는 연결된 left나 right가 없으므로 current에는 A가 담긴다.
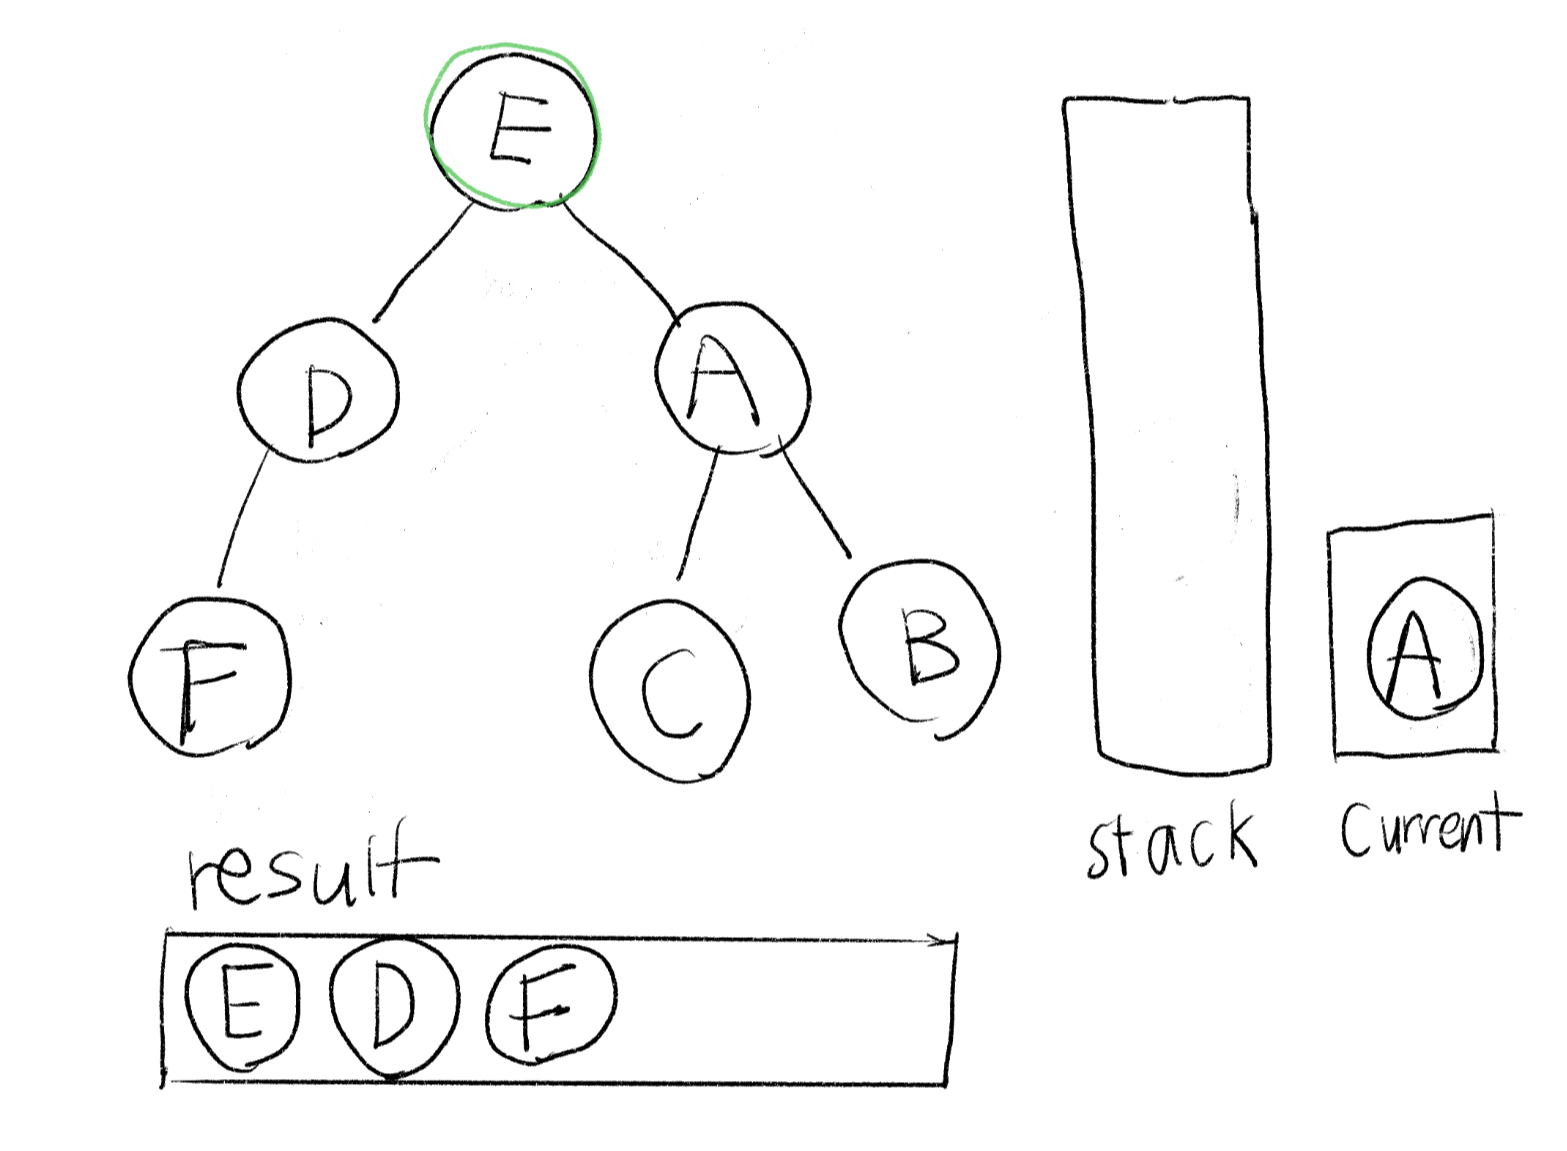
그 이후에는 같은 과정을 반복한다.
결과: E - D - F - A - C - B
이 로직을 코드로 구현하면 아래와 같다.
class Node {

	...

  DFS() {
    let result = [];
    let stack = [this.root];

    while(stack.length !== 0) {
      let current = stack.pop();
      if (current.right) {
        stack.push(current.right);
      }
      if (current.left) {
        stack.push(current.left);
      }
      result.push(current.data);
    }
    return result;
  }

	...
}
BFS
BFS는 queue를 활용해 트리를 탐색한다. queue는 FIFO(First In First Out)의 구조를 가진다.
먼저 들어온 요소가 먼저 나간다는 뜻이다. 아래의 예시를 보자.
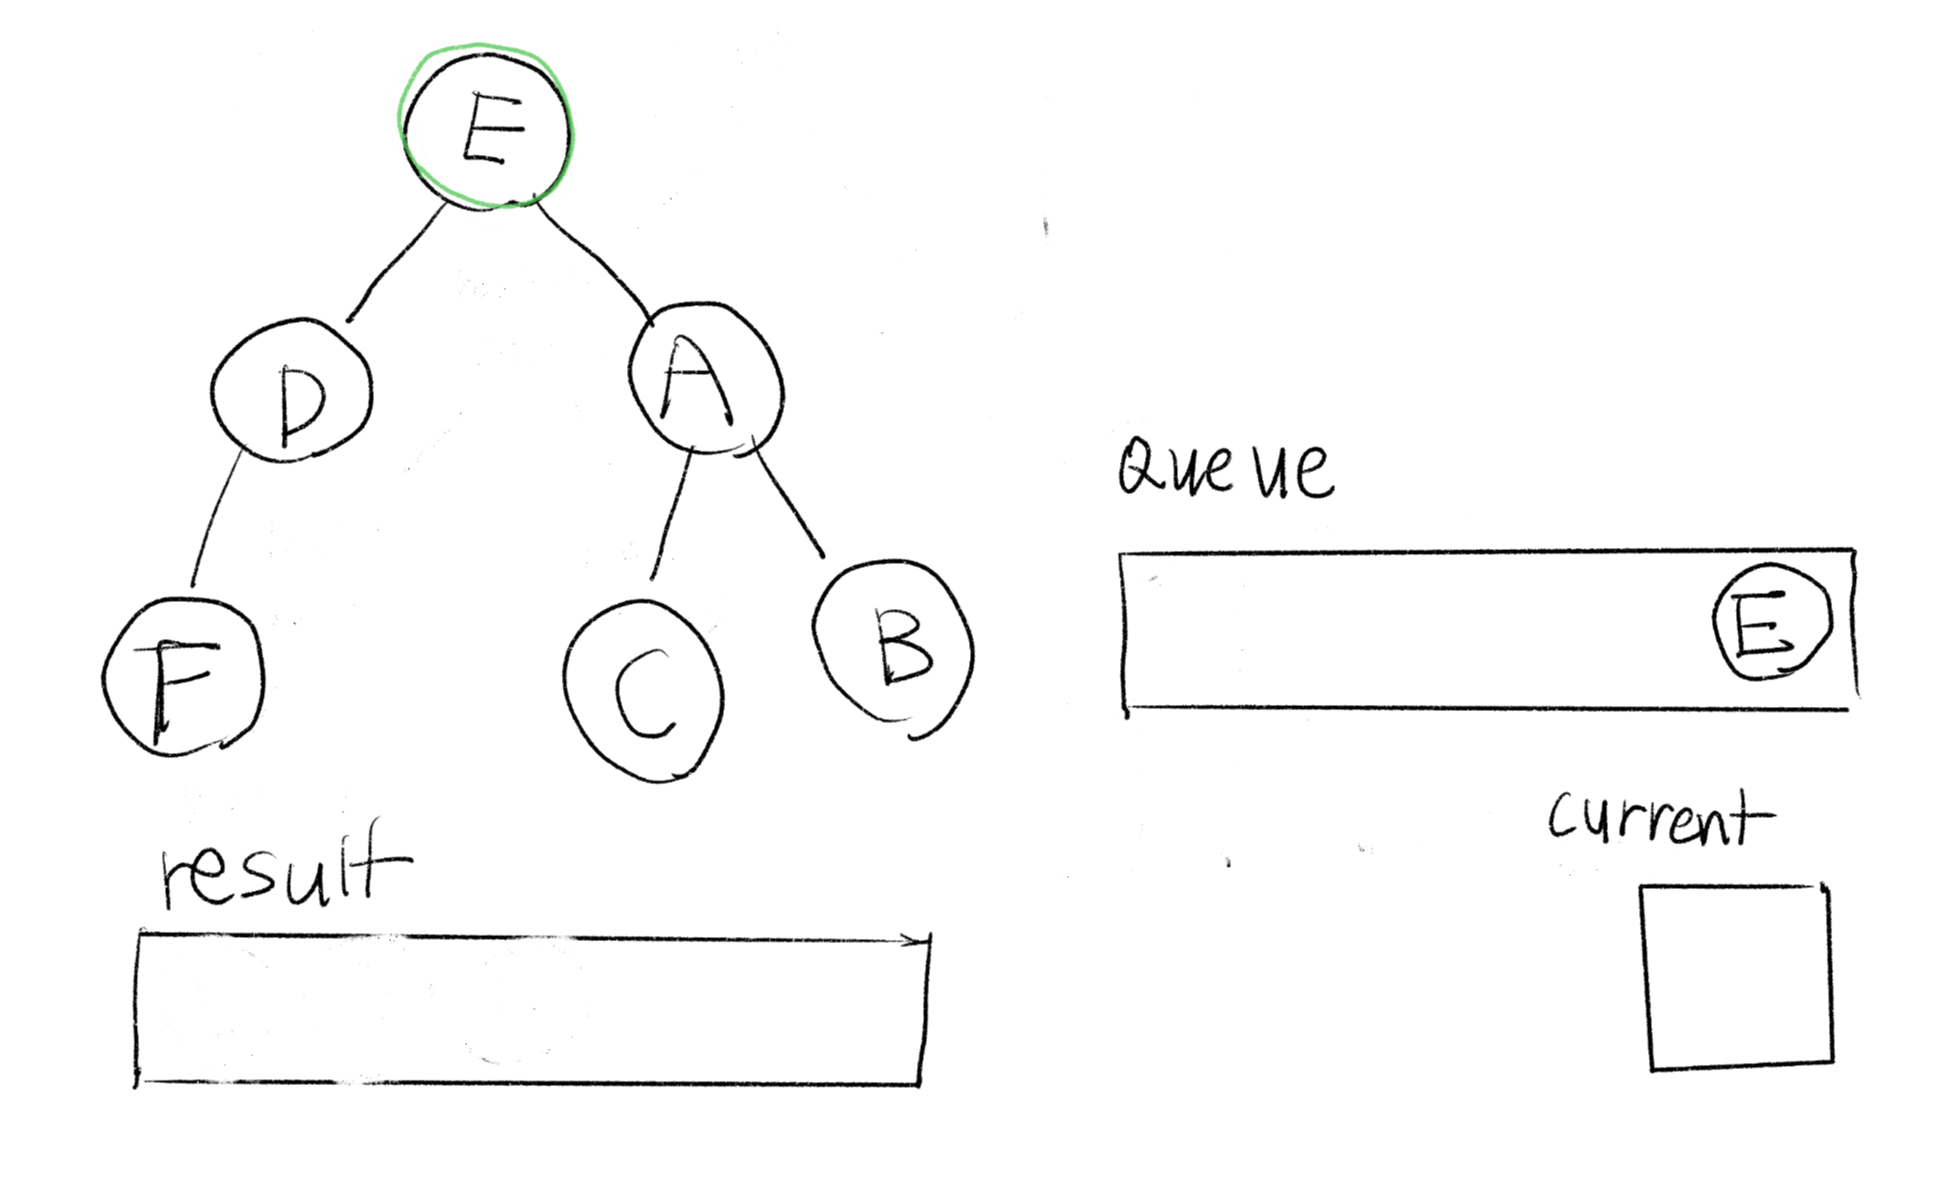
E가 current를 거쳐 result로 가면 E와 연결된 A와 D가 queue에 쌓인다.
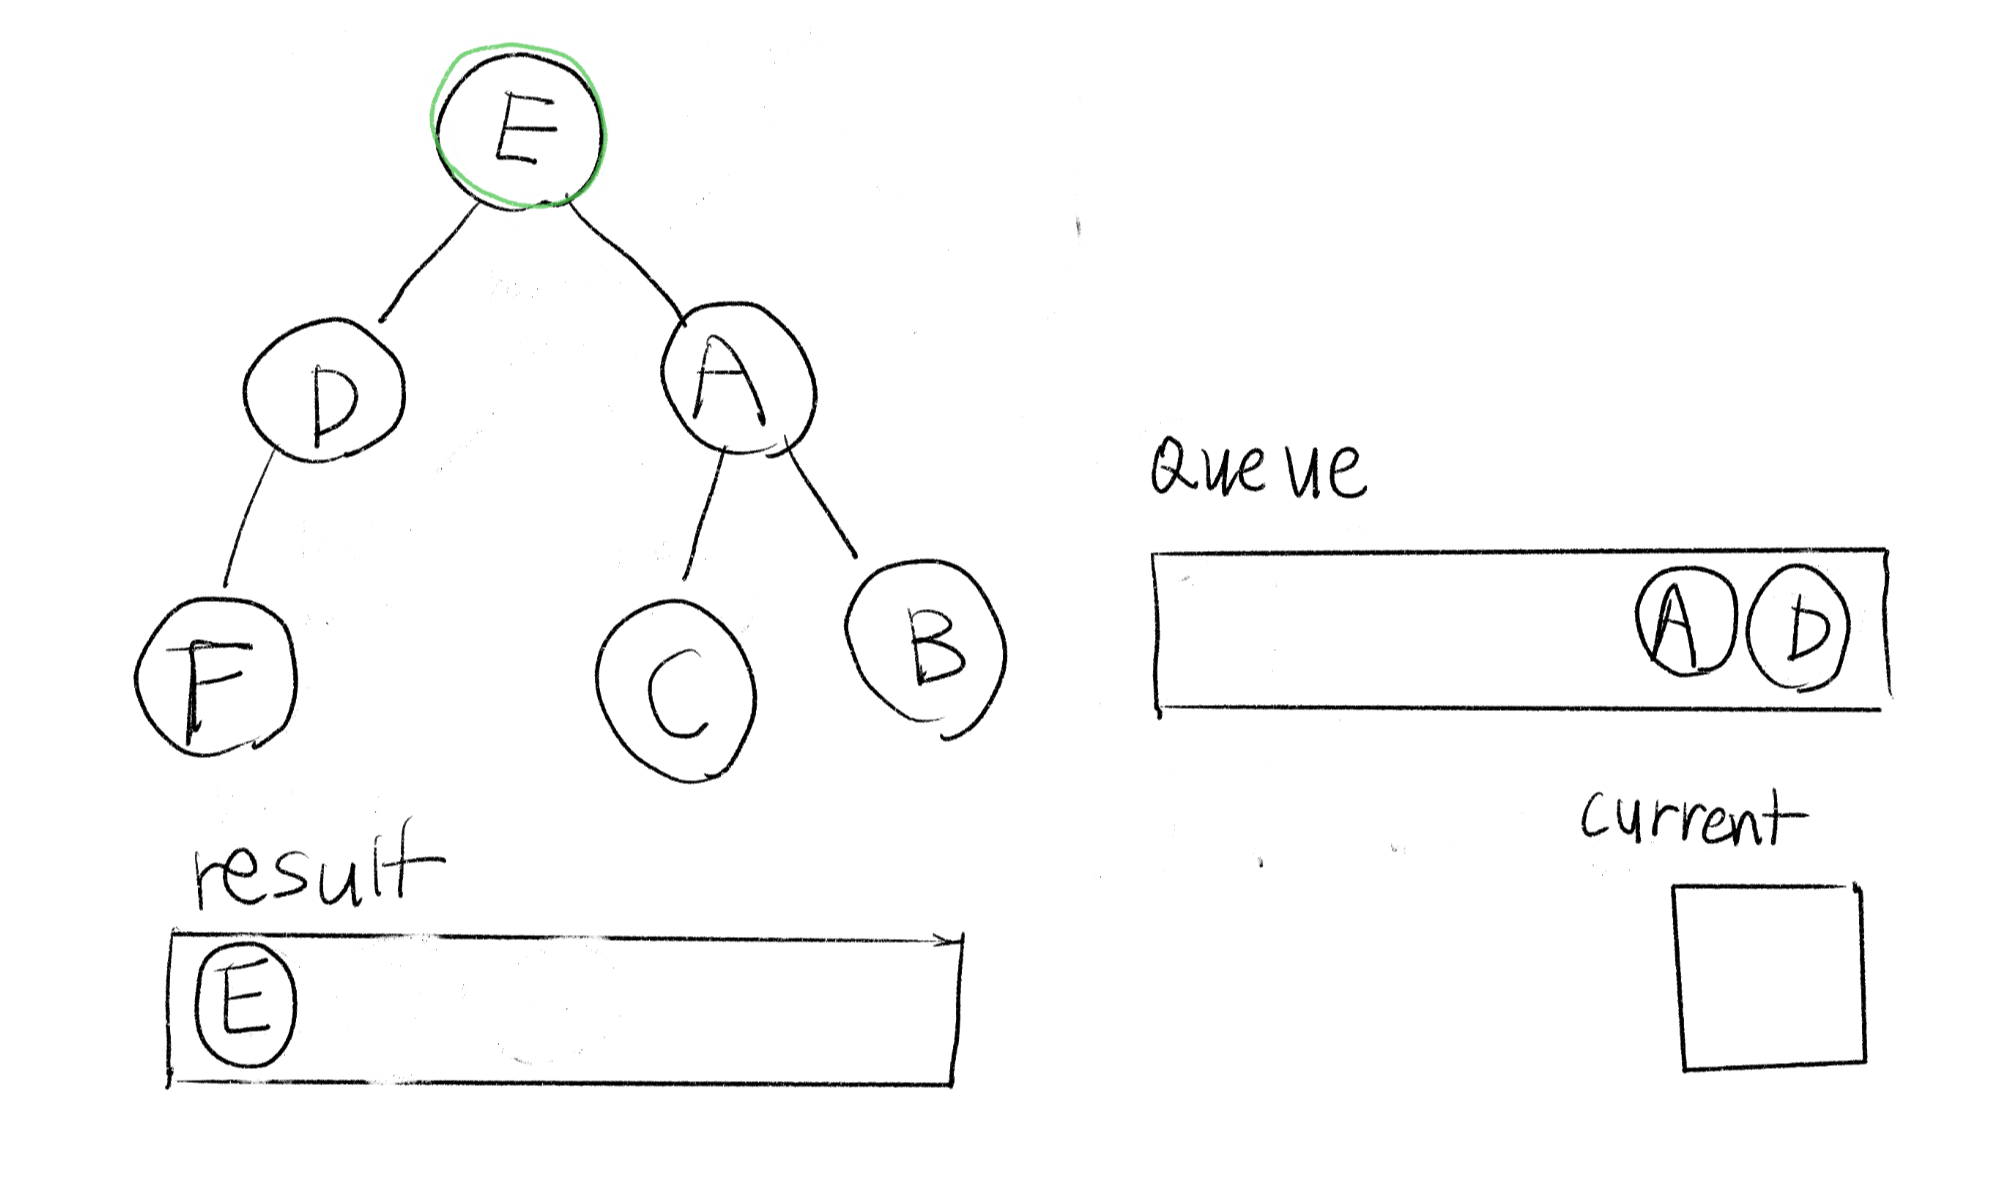
D가 current를 거쳐 result로 가면 D와 연결된 F가 queue에 쌓인다. 여기서 중요한 점!
F가 queue에 들어왔지만 우리는 A를 먼저 뺄 것이기 때문에 같은 층부터 result에 쌓을 수 있게 된다는 것!
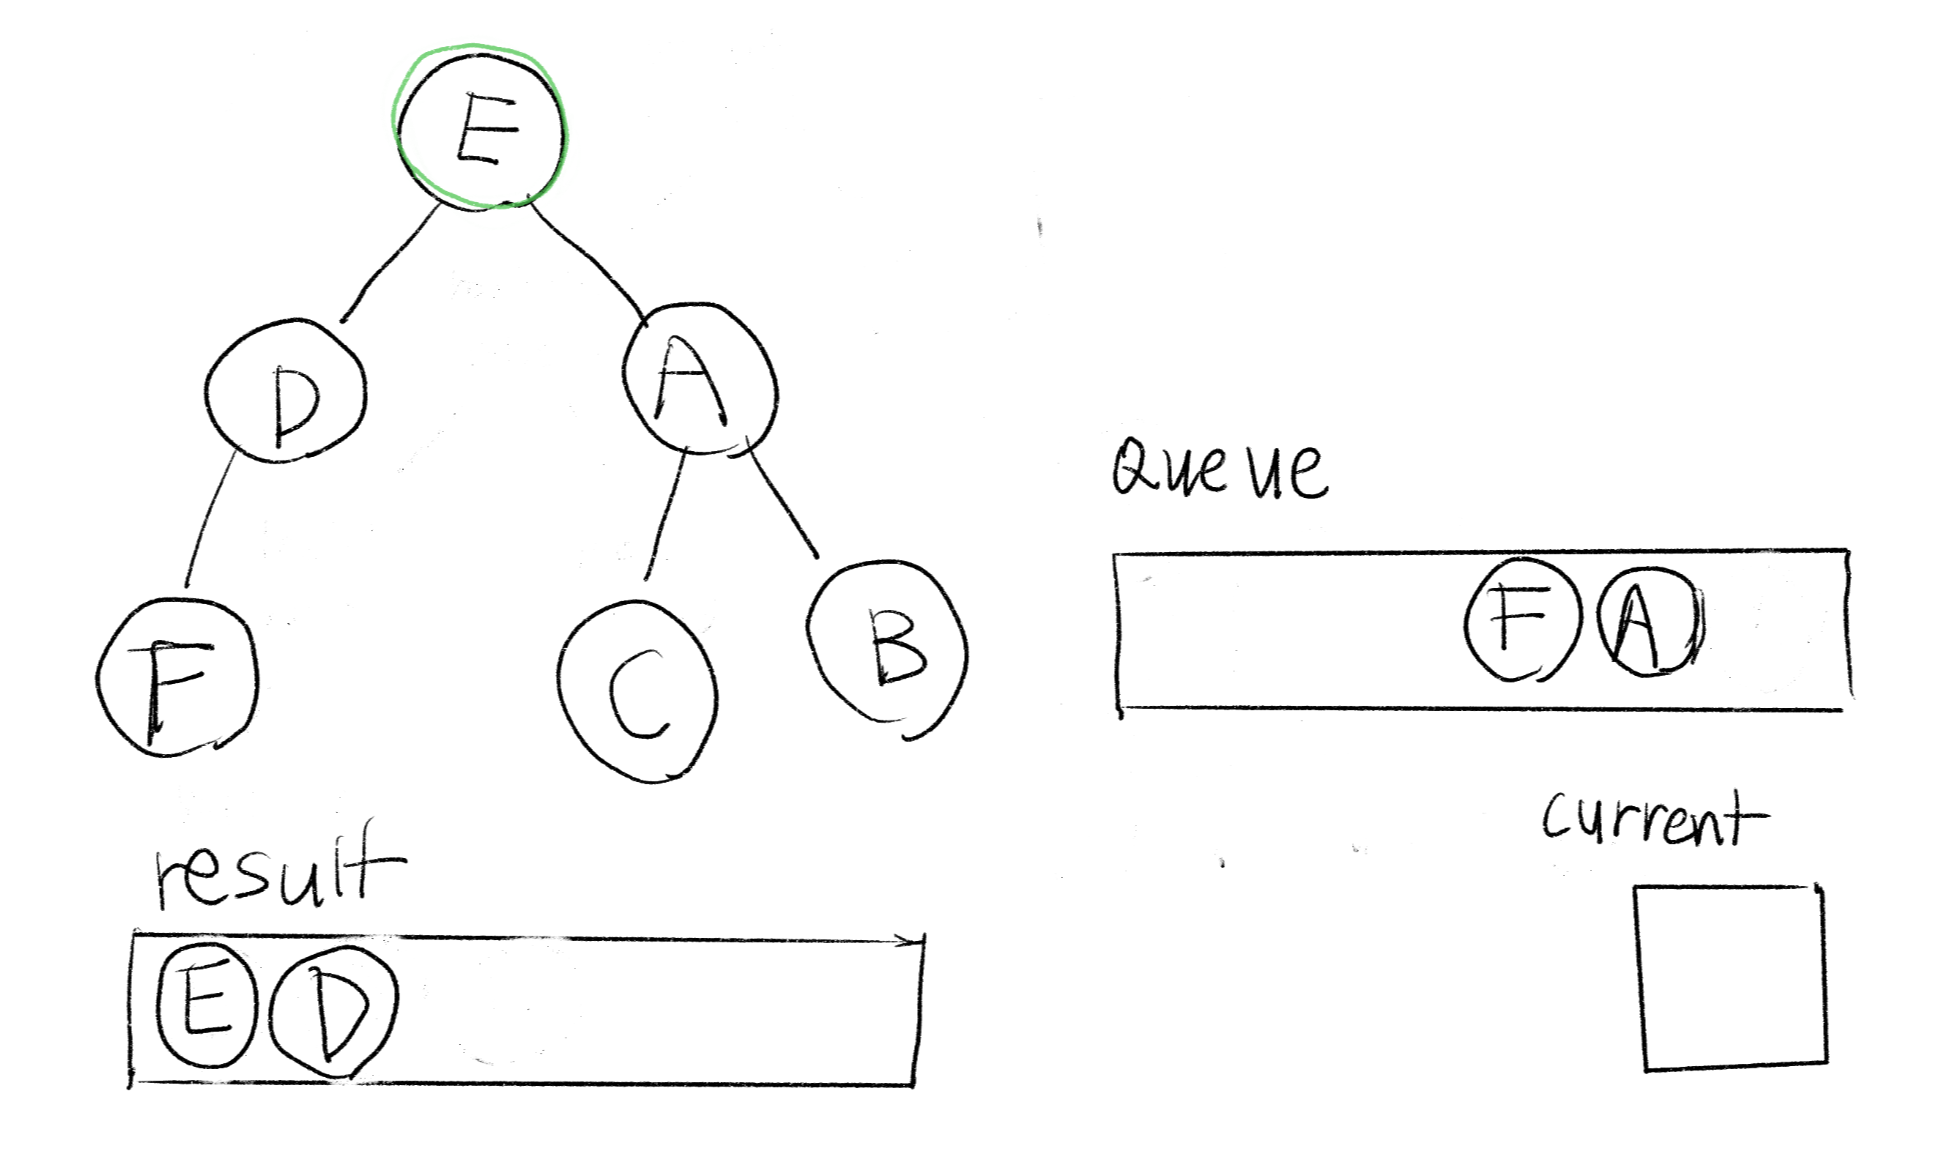
A가 current를 거쳐 result로 가면 queue에 C와 B가 쌓인다.
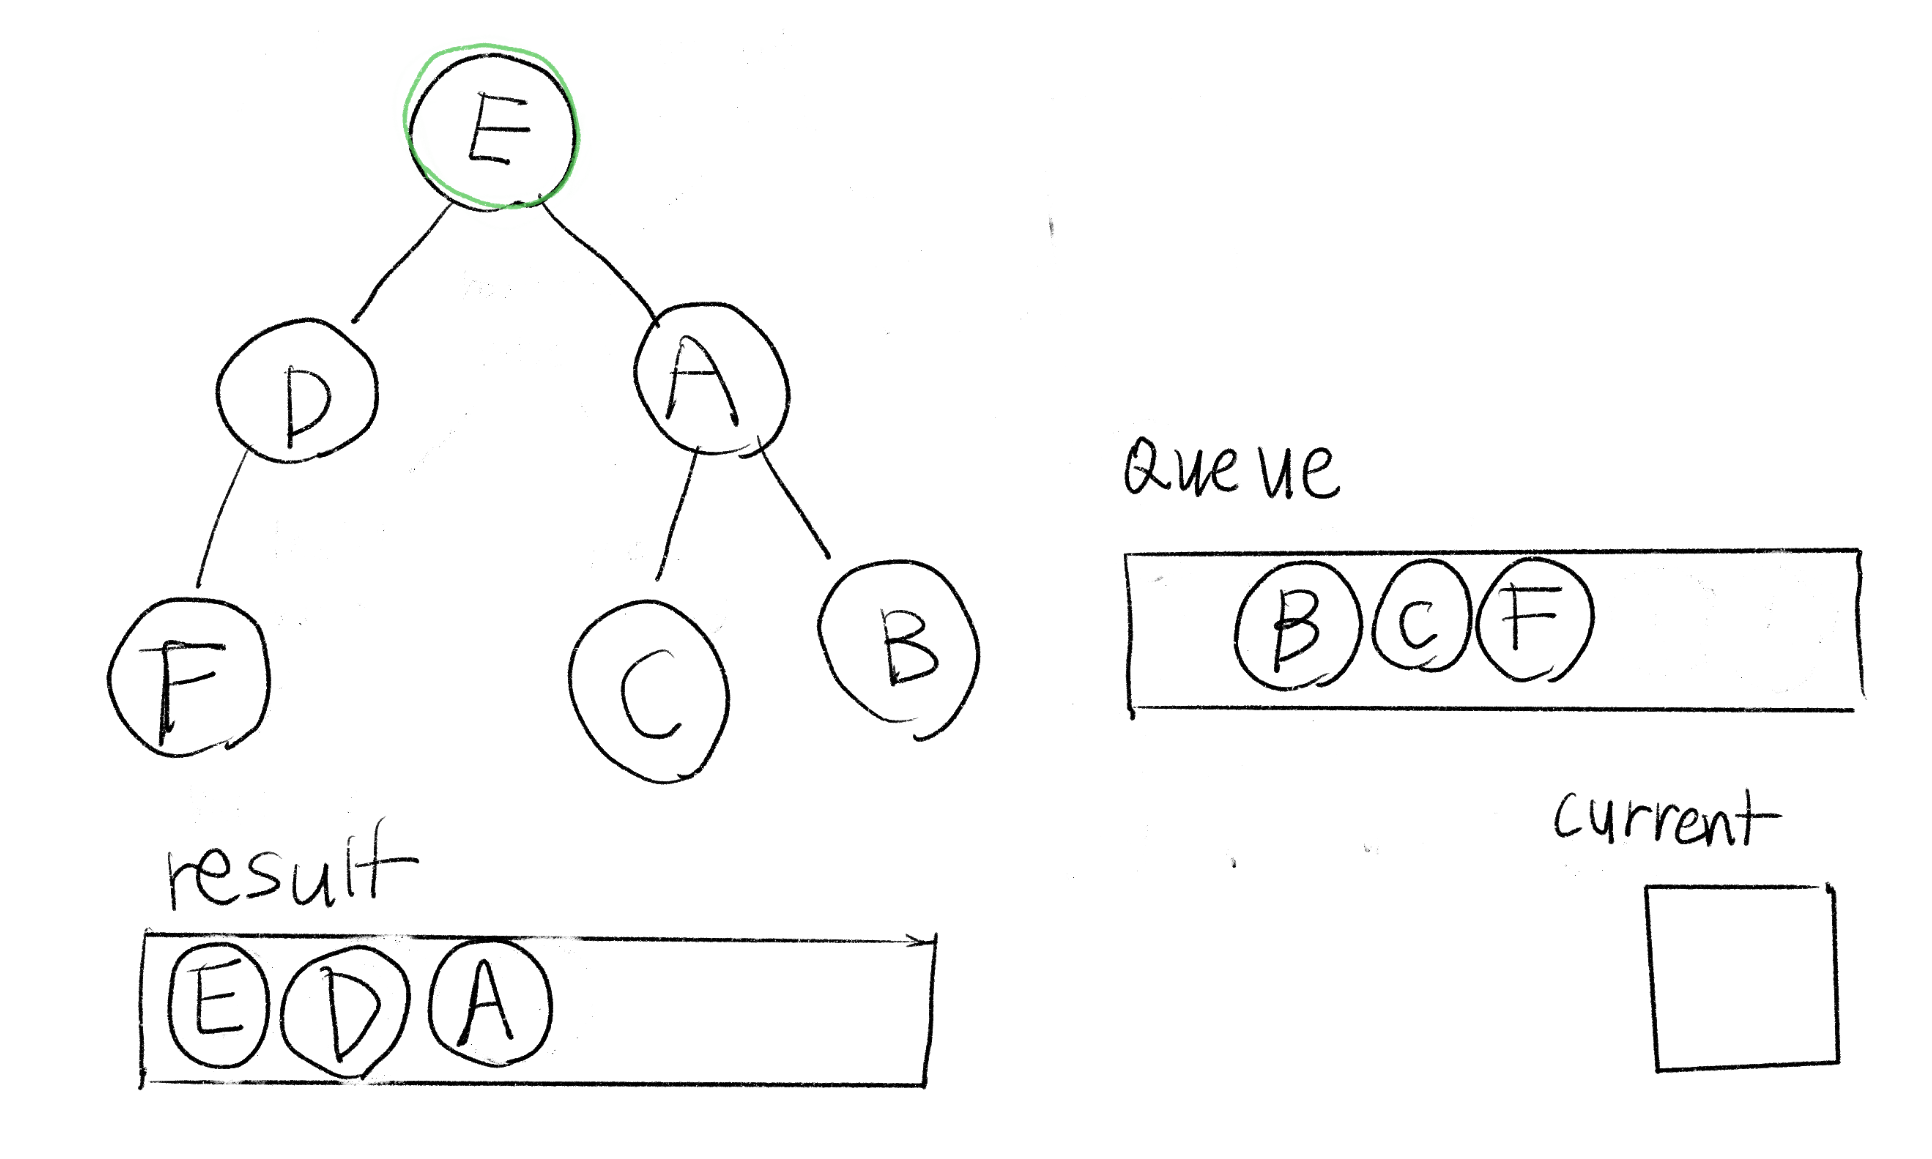
위 과정을 반복하면 탐색이 끝난다.
결과: E - D - A - F - C - B
로직을 코드로 구현하면 아래와 같다.
class Node {
	...

  BFS() {
    let result = [];
    let queue = [this.root];

    while(queue.length !== 0) {
      let current = queue.shift();
      if (current.left) {
        queue.push(current.left);
      }
      if (current.right) {
        queue.push(current.right);
      }
      result.push(current.data);
    }
    return result;
  }
}
'프론트엔드 개발 > Algorithm' 카테고리의 다른 글
| Rotated Array Search (0) | 2023.03.10 |
|---|---|
| [알고리즘] DFS (객체 순회) 문제 (0) | 2023.02.28 |
| 깊이 우선 탐색(DFS, Depth-First Search) (0) | 2023.02.24 |
| 올바른 괄호, balancedBrackets (advanced) (0) | 2023.02.23 |
| javascript 거듭제곱 (0) | 2023.02.18 |